
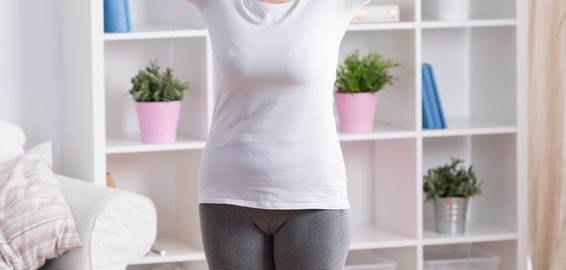
If you are new to yoga and would benefit from some guidance on pose technique, then welcome!
Today we will cover the five most common yoga poses!
That way, when you decide to try a yoga class (online… or in the future, in an actual studio!), you’ll already have some foundational knowledge to keep up!
These poses may look a little different in your own body. Everyone moves differently. You should never force a movement or a pose. Use supports such as chairs, blocks, counters as needed for safety and range of motion help. Please do not be discouraged if a pose is difficult. As Physiotherapists we can give you tools to make movements and positions more accessible and comfortable. It doesn’t have to be all or nothing.
Have Fun!
- Uttanasana, Standing Forward Bend
This is a calming pose that can be used to offload the back after too much standing, retrain your movement so that you learn to bend more through your hips rather than low back, and stretch your hamstrings!
- If you remember our Tadasana pose from the Balance Series, start there.
- While standing at the front of your mat, place hands on hips
- Inhale, feeling your spine lengthen as you stand up more upright
- As you exhale bend knees slightly, hinging at the hips, fold forward
- Maintain the whole torso as straight as you can until almost parallel with the ground
- If able to continue only hinging at the hips, perfect! If not, when you cannot keeping folding without rounding the back, allow the back to round as you reach the arms down to the ground
- Your hands will rest on the floor on either side of your feet, fingertips in line with your toes
- If you cannot reach that far, feel free to allow some bend into your knees, trying to bring your chest as close as you are comfortable to your thighs, hands as close to the ground as you are able. You can also place your hands on yoga blocks or even a chair to bring the floor up higher
- Allow the head to hang toward the ground, gaze at the shins
- Think about engaging your quadriceps muscles (front thighs) and pull your shoulder blades away from the ground, giving your neck more space

Hold position for 5 breaths, then, as you inhale, come into a Halfway Lift, lifting up your chest, straightening out the torso, so that it’s as close as you can to being parallel off the ground (creating an upside down L shape with your torso and legs). Your hands can be on a block on the ground before you, on your shins, or on your thighs.
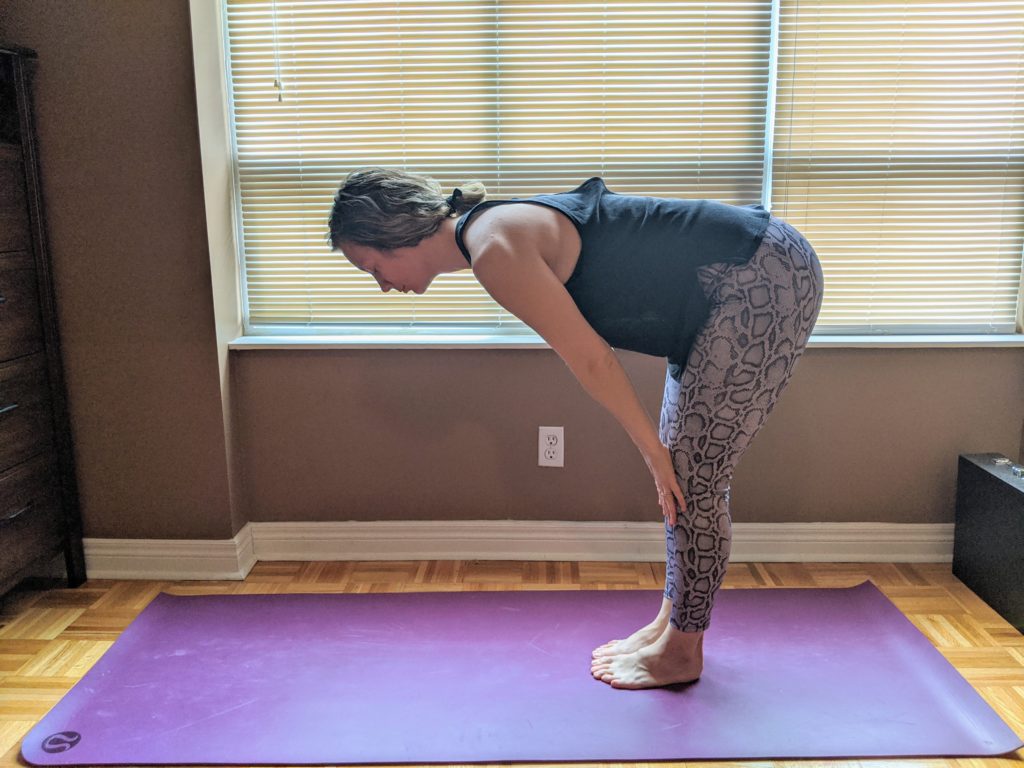
You can maintain a slight bend in your knees if your hamstrings are feeling too tight. On exhale, return back to the Standing Forward Bend. On your next inhale, slowly straighten up fully, vertebra by vertebra, raising the head and chest first.
- Virabhadrasana, Warrior II
The Warrior II pose challenges your physical and mental endurance, strengthening your thigh muscles, while also improving your balance and ankle mobility.
- Begin in Tadasana, or Mountain Pose (standing at the front of your mat, big toes touching and heels about an inch apart)
- On an exhale, step back about three to four feet with your left foot, heel down on the ground
- Turn the left toes outward so the left foot is perpendicular to the right. Keep the heels in line with each other.
- Lift up the arms so that they are parallel to the ground, right one pointing forward over the right leg, left one behind you. Palms are parallel to the ground as well.
- Bend the right knee, aiming to have the knee stacked directly over the ankle and the thigh parallel with the ground (or as close as you are comfortable). You may need to shift the left foot farther back to do so.
- Do not lean the torso forward; instead, keep it stacked over the pelvis
- Gaze over the fingers of your right hand as it stretches out before you
- Relax the shoulders if you feel them tensing
- Engage your right quads and inner thigh muscles and press firmly into the mat with your left foot, engaging the inner thigh muscles, in order to stay strong and stable in the pose
Hold position for 5-10 breaths, then return to Tadasana and repeat on the reverse side. From Warrior II, if your low back is not painful, you can flow into Peaceful Warrior as you gently lean your torso back, turn your front palm up, then reach your front arm overhead and behind you. Your back arm slides down to rest on the leg behind you. Turn your gaze up to the sky.
- Bharmanasana, Table Top
Table Top is a common transition pose in yoga, used in many sequences to stabilize balance when flowing from one position to the next. It is also a base pose for other more challenging variations, such as the Bird-Dog for core strengthening, or Thread The Needle for stretching the upper back and shoulders.
- Coming down onto your hands and knees, make sure you are well aligned with hands directly under shoulders and knees directly under hips. This means your hands are shoulder-width apart, and your knees and feet are hip-width apart.
- If needed, double roll your mat or use a cushion underneath the knees for additional comfort
- The torso should be parallel to the ground, low back flat like a “table top”, and neck in line with the rest of the spine (do not let head hang low and do not crane neck to look forward)
- Often, when you feel like the back is flat, you need to drop the belly down just a little bit more
- If still having difficulty knowing if your torso is fully parallel, see yourself in a mirror or have someone who can see you, guide you until you are there and know what it feels like
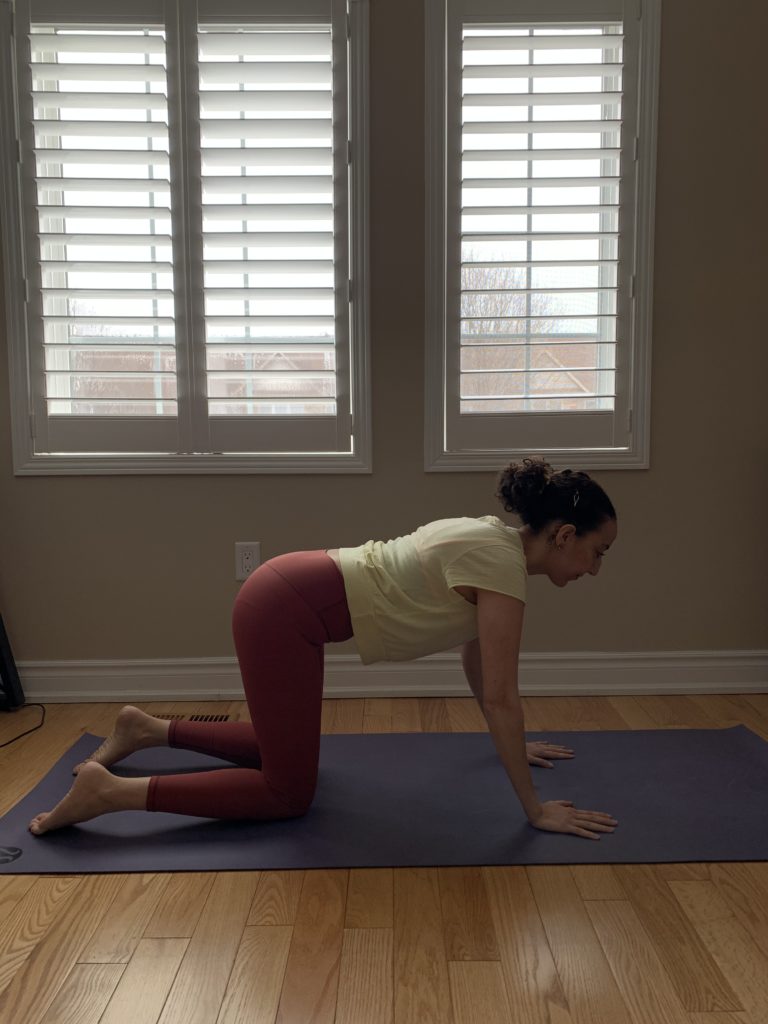
Hold position for 5-10 inhales. Once you are comfortable with and aware of alignment, you can transition into spine mobility with the Cat-Cow. As you inhale, raise the chest forward, pulling shoulder blades together, drop the belly, point tailbone to ceiling, and gaze upwards. This is your Cow. As you exhale, tuck tailbone down, round the whole spine up toward the ceiling while spreading shoulder blades apart, and hang head low. This is your Cat. During both positions, make sure shoulders remain stacked over hands and hips over knees.
- Adho Mukha Svanasana, Downward Facing Dog (Down Dog)
Tip: the name of a mobile app you can use to get you started! They offer different styles of yoga at different levels of ability. Currently, they are offering all content for free as we all practice social distancing!
- Starting from a Table Top position, spread out your fingers and press firmly into your fingertips
- Engage your abdominals and tuck your toes under your feet
- On an exhale, lift the hips up to the sky as you straighten out the knees
- Hands should be shoulder-width apart, pushing the mat away, and feet should be hip-width apart
- Let the head hang freely, framed by your upper arms, as your gaze is toward your feet
- Spread out the shoulder blades (toward your armpits) to reduce tension on the neck
- If hamstrings feel too tight, allow for a slight bend in your knees
- Imagine you are creating an upside down V shape with your body!
- Then, to “walk your dog”, alternate bringing one heel down to the mat, then the other
- After a while, see if you can rest the heels closer, or fully, onto the mat, thereby stretching the claves
- Keep the torso in a straight line as much as you can, hips pressing toward the ceiling
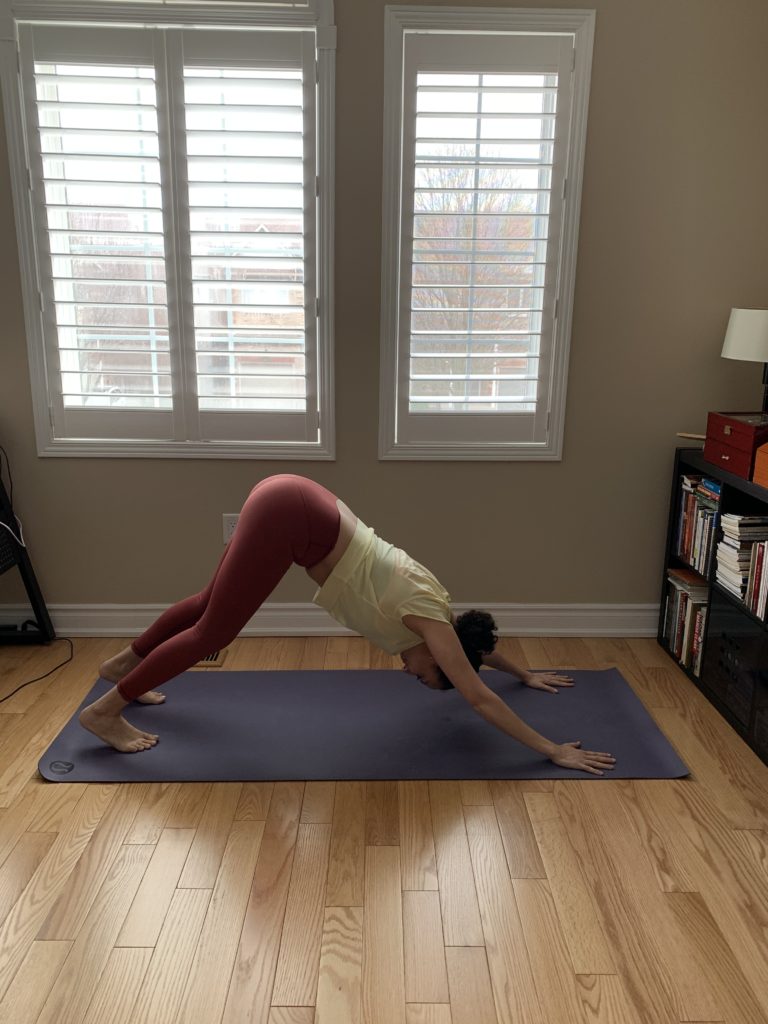
Hold position for 5-10 breaths.
If you find Downward Facing Dog to be difficult for repetitive or sustained practice, you can substitute it with Table Top! You can also try out the position for one or 2 breaths and build up shoulder strength and endurance to do this. In a class you may try it once and then sub table top and then gradually do more and spend longer in the pose.
- Anjaneyasana, Low Lunge
Low Lunge is a transitional pose, often flowing down from Downward Facing Dog to another position. On its own, it challenges your strength and balance, while stretching your hip flexors. It’s also a base position for getting into deeper stretches, such as the Pigeon or Lizard poses.
- Starting in Downward Facing Dog, on an exhale, place your right foot forward between your hands
- Keep right knee stacked over right ankle, as much as you are able
- Lower the left knee down to the ground
- You should feel a stretch in the left hip flexors (upper front thigh and groin). If not, you can slide the left leg further away, or shift the hands and right leg more forward.
- If you are propping up the toes of the left foot, lay the top of the foot fully down on the ground
- On an inhale, bring your torso upright and your arms overhead, biceps framing the head and palms facing each other
- Tuck tailbone down and open up the chest, and if you don’t have any neck or low back pain, slightly lean torso back and gaze up to the sky
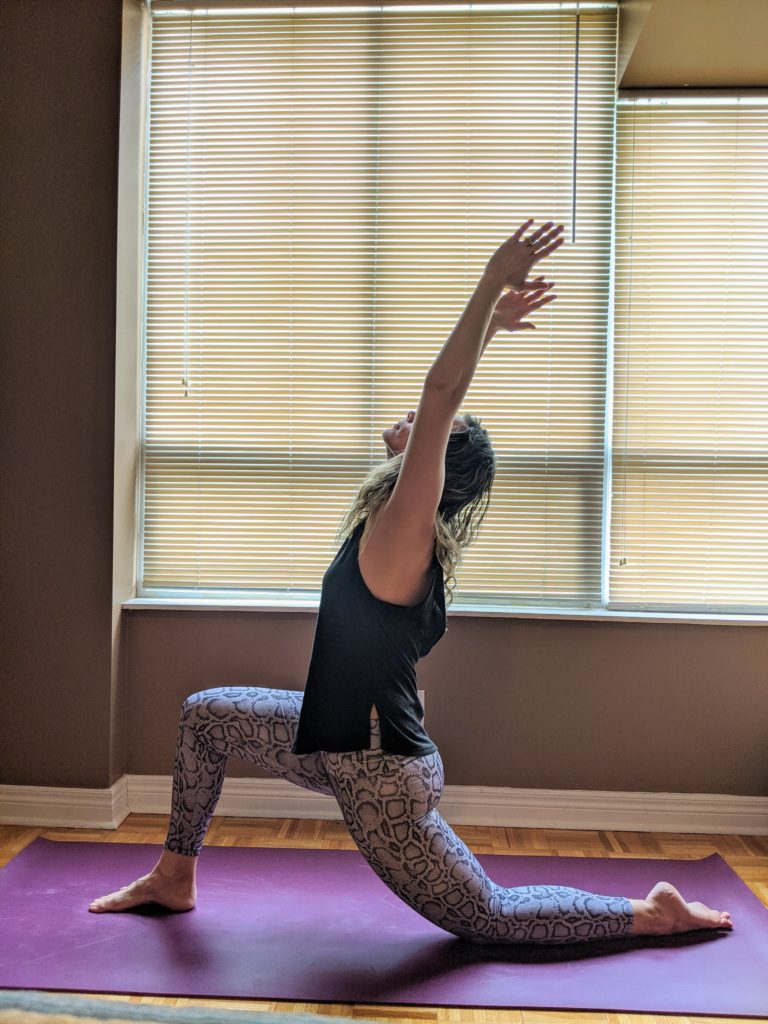
Hold position for 5 breaths, then windmill arms back down to frame the front knee, lift the back knee off the ground, engage the core and return back to Downward Facing Dog. From there, repeat for the other side. If Low Lunge is uncomfortable for the back knee on the ground, feel free to continue having the toes propped up which avoids full pressure on the knee, or even double rolling your mat or placing a cushion underneath the knee.
Remember that any pose can be modified. If certain parts of the poses cause you discomfort, such as a deep knee bend when the thigh is parallel to the ground, or arching your low back, or if gazing upward strains your neck, then it’s okay to perform these movements only partially, or modify them as needed!
Bonus Pose: Savasana, Corpse Pose
At the end of most classes, practitioners are often led into Savasana to gradually relax the body and release stress. In many yogic traditions, the purpose of the movements ad poses (“asana”) is to prepare the body to meditate. Allow the Savasana pose to be your reward and let your hard work, and focus on your mat sink in.
- Lay down on the mat (using bolsters or block support as needed, e.g. under knees, or head)
- Straighten out the arms and legs, feet hip-width apart or wider
- Turn palms up and shimmy the shoulder blades directly underneath the torso
- Close your eyes
- Mentally, perform a body scan, starting from the head, then working down to the neck, shoulders, elbows and wrists, chest, abdomen and back, pelvis, thighs, knees, lower legs, ankles and feet
- As you become aware of each of these body parts and how they make contact with the mat, imagine each part getting heavier and sinking into the ground
- When you finish, enjoy the stillness
- Any time a thought flits through your mind, acknowledge it, then release it into the ether
- If it helps, focus on your breath, following in each inhale and then each exhale, noticing how your body moves in response
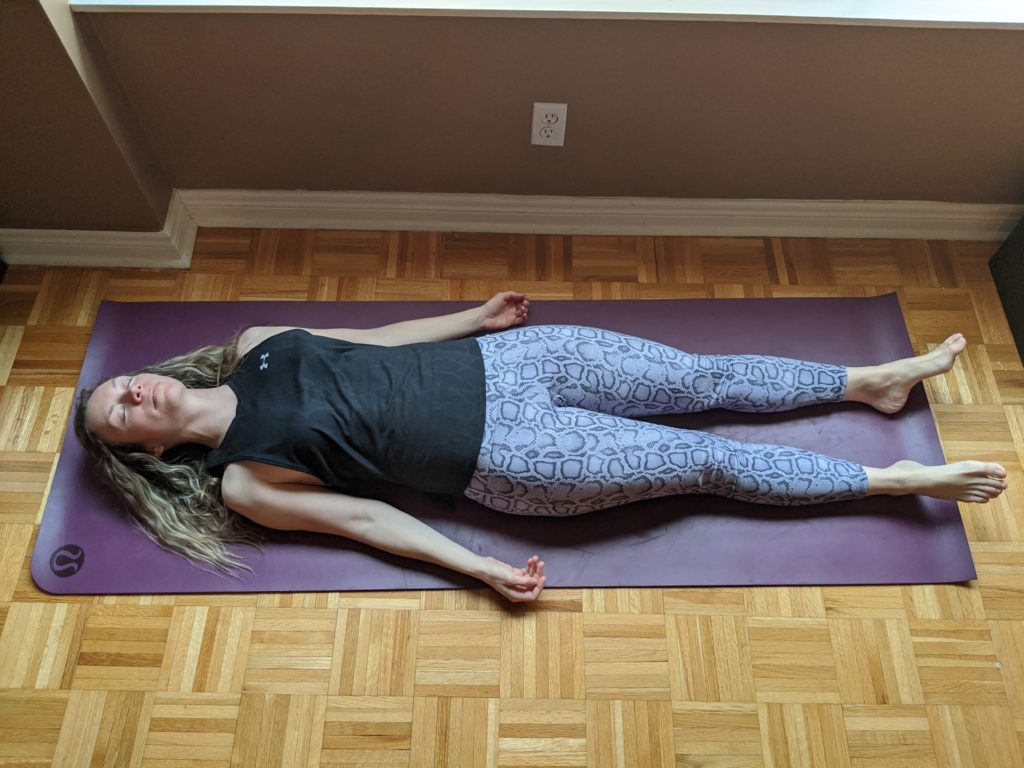
Stay in this position for at least a few minutes. When you feel ready, turn to whichever side is more comfortable, then push yourself into a sitting position. Namaste 😊
If you have difficulty with any of the poses were are here to help. As Physiotherapists we can put all of the information together and make yoga (and exercise? more accessible and adaptable to you and your body. Contact us if that is something you are interested in.